
SpiderFoot is a Open Source Intelligence (OSINT) tool that combines the power of many Internet API’s to gather intelligence on Names, E-mail Addresses, Domains, IP Addresses, and more. This article will help you get setup with a local installation of SpiderFoot using Docker, guide you through the initial setup and configuration, and walk through some use cases that you may find useful.
This tutorial is written for Debian-based Linux kernel’s, but can be applied to other Linux OS’s and Windows as well. I’ll be running SpiderFoot from the /opt directory.
Running SpiderFoot in Docker
Install Prerequisites
Before we get started with the installation, we’re going to need to make sure that we have some prerequisites. SpiderFoot was written in Python3 and requires at least Python3.7 to be installed.
Installing Python
Use the following command to install Python version 3.7.
sudo apt install python3.7
Alternatively, use the following command to install the latest version of Python3 for your OS.
sudo apt install python3
Install Docker Compose
We’ll be using Docker and Docker Compose to deploy our instance of SpiderFoot. Using the following command, we install Docker Compose and its prerequisites.
sudo apt install docker-compose
Install Git
We also need Git in order to clone the SpiderFoot project from GitHub.
sudo apt install git
Download SpiderFoot
Navigate to the directory where you’d like SpiderFoot to be located.
$ cd /opt

$ sudo git clone https://github.com/smicallef/spiderfoot.git
The SpiderFoot repository conveniently already contains a docker-compose.yml, along with a docker-compose-dev.yml and docker-compose-full.yml. We are going to use the standard docker-compose.yml as we don’t need to additional development or command line tools that can be included with SpiderFoot.
Below is the docker-compose.yml configuration as of 2023-07-15.
version: "3"
# Basic usage:
# $ docker-compose up
#
# Dev environment (code directory mapped into container):
# $ docker-compose -f docker-compose.yml -f docker-compose-dev.yml up
#
# Full image (all CLI tools installed):
# $ docker-compose -f docker-compose.yml -f docker-compose-full.yml up
#
# Spiderfoot data resides in a Docker volume
#
# $ ls -lh /var/lib/docker/volumes/spiderfoot_spiderfoot-data/_data
# total 104K
# drwxr-xr-x 2 user user 4.0K Sep 22 09:51 cache
# -rw-r--r-- 1 user user 100K Sep 22 15:19 spiderfoot.db
services:
spiderfoot:
build:
context: ./ # The location of the Dockerfile which contains information on building the container.
volumes:
- spiderfoot-data:/var/lib/spiderfoot
image: spiderfoot
container_name: spiderfoot
ports:
- "5001:5001"
restart: unless-stopped
volumes:
spiderfoot-data:
You can check out the .Dockerfile located in /opt/spiderfoot for additional details.
Start SpiderFoot in Docker
Now that we have the appropriate files and configuration, we can use docker-compose to start up SpiderFoot. the -d option tells Docker to start the container in daemon mode.
$ cd /opt/spiderfoot

$ sudo docker-compose up -d

Starting spiderfoot ... done
To test SpiderFoot, navigate to http://localhost:5001 in your local web browser. By default, SpiderFoot is not password protected. It is recommended to follow the Security Guidance in the SpiderFoot documentation for setting up Basic Authentication, and a TLS/SSL Certificate, if your SpiderFoot instance is public.
Using SpiderFoot
Configure SpiderFoot API Keys
Now that SpiderFoot is up and running, we need to configure the modules with our own API keys and other settings. We can either do this from the Settings interface, by navigating to each module and supplying the necessary details. Alternatively, we can import a list of API Keys directly. Settings that require an API key for full functionality will be listed with a lock next to it.
Let’s use this second option. First, navigate to Settings in the top navigation. From here, click on the Export API Keys. This will download a file titled, ‘SpiderFoot.cfg’, which is a CSV formatted file that contains the list of modules and its accompanying API key.
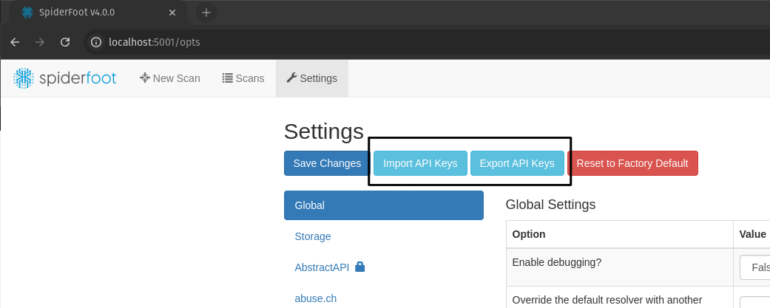
Once you’ve filled out the API key for as many modules as you’d like to use, simply re-upload ‘SpiderFoot.cfg’ using the Import API Keys button. It is also recommended to review the other settings associated with the modules that you’d like to use to ensure that they are correctly configured for your use case.
Start a Scan in SpiderFoot
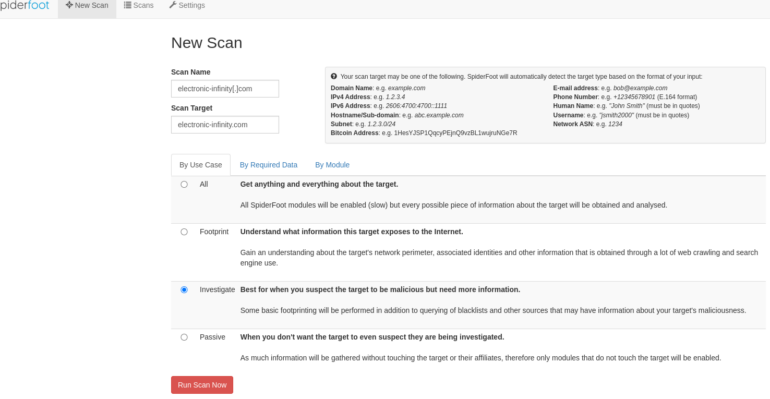
Now that we have SpiderFoot setup and configured, lets run a search. I’m going to start a search for a domain that has been attributed to Command and Control activity; VirusTotal acknowledges that it is malicious.
Navigate to SpiderFoot, and click on ‘New Scan’ from the top navigation. The ‘New Scan’ page provides a simple interface for creating your search using as many or as little modules as you’d like. For this purpose, I’ll be using the ‘Investigate’ use case in order to identify malicious information. Once you’ve filled out the form, click ‘Run Scan Now’.
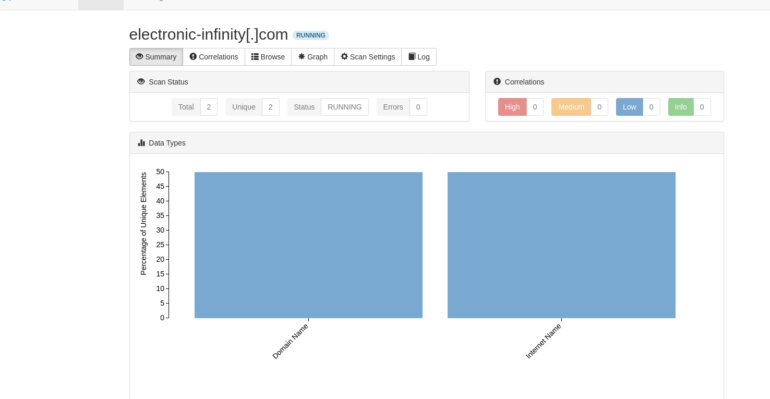
Once started, you’ll be redirected to the scan page, and SpiderFoot will begin gathering data.
Back on the ‘Scans’ page, you’ll see our search listed, the target, the date and time of when the scan started and finished, the current status, how many elements have been found, and simple actions to stop, re-run, or delete the search.

Understanding SpiderFoot scans
Search data is presented on it’s own page, and provides a number of options for you to be able review the data and the scan.

- Summary – The summary provides an overview of the scan, it’s status, data types found, and any correlations identified.
- Correlations – SpiderFoot with provide details on correlations that it finds with any of the data points available from the scan.
- Browse – Browse allows you to browse each data point by type.
- Graph – The Graph provides you with a visual of the various connections that data points have.
- Scan Settings – Scan Settings shows what modules applied to the search and what configuration options were used.
- Log – The Log is where you can troubleshoot any issues with your scans. If there are any issues with your API keys, you’ll be able to see that here.
Scan Targets for SpiderFoot
SpiderFoot has the capability of searching for various types of targets including domains, usernames, and even Human Names. Here is a list along with examples of scan targets that can be configured in SpiderFoot scans.
| Domain Name | Example(s) |
|---|---|
| IPv4 Address | 1.2.3.4, 8.8.8.8 |
| IPv6 Address | 2606:4700:4700::1111 |
| Hostname/Sub-domain | example.com, john.example.com |
| Subnet | 1.2.3.4/0 |
| Network ASN | 1234 |
| Bitcoin Address | 1HesYJSP1QqcyPEjnQ9vzBL1wujruNGe7R |
| E-mail Address | johnsmith@example.com |
| Phone Number | +15555555555 (Format: [+][Country Code][Area Code][Subscriber Number])* |
| Human Name | “John Smith”** |
| Username | “jsmith1″** |
* Phone numbers must be supplied in E.164 format.
** Human names and Usernames must be quoted using double quotes.